
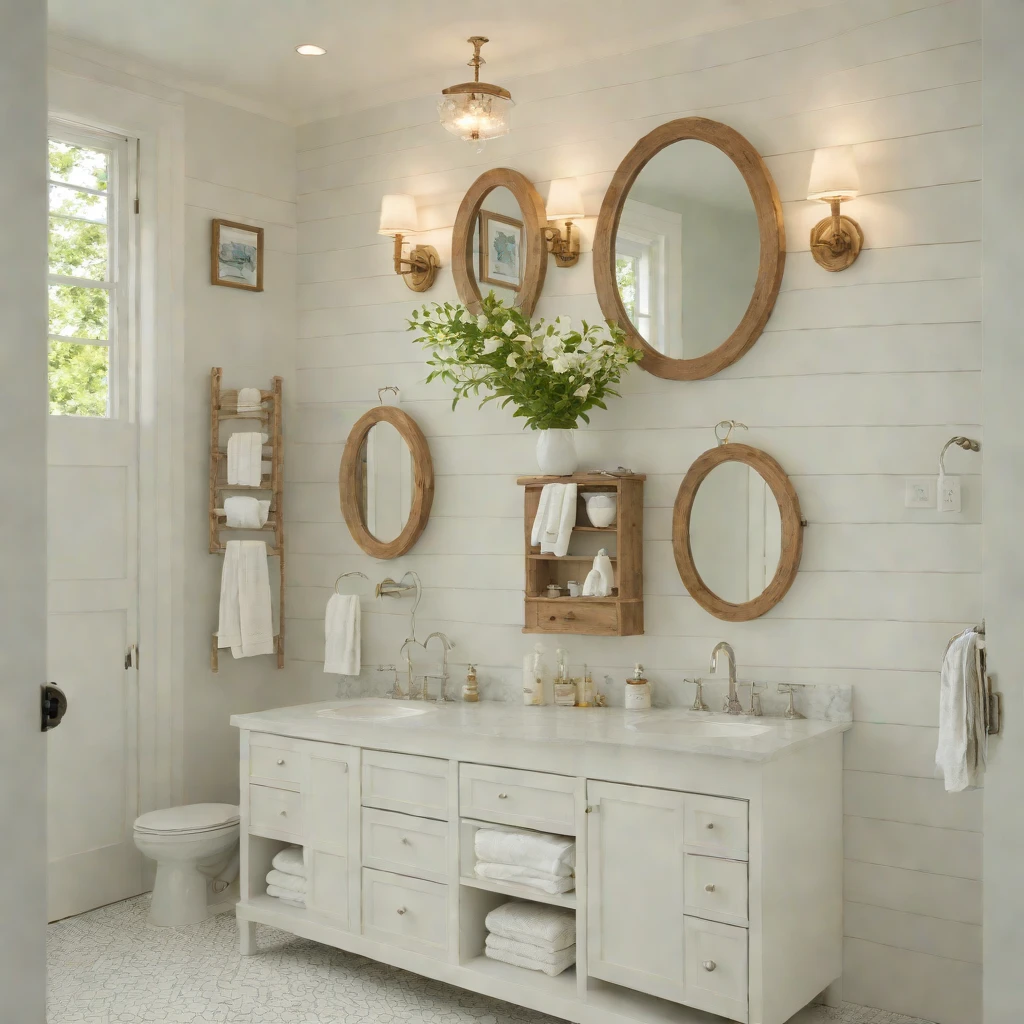
Ah, the bathroom. Often a purely utilitarian space, yet with the right design choices, it can transform into a tranquil retreat, a spa-like sanctuary, or a crisp, refreshing haven. If you’ve been dreaming of infusing your bathroom with that breezy, light-filled atmosphere reminiscent of a seaside escape, then you’re in the perfect place. We’re diving deep into the enduring charm of bathroom shiplap ideas, a design element that effortlessly delivers a fresh, coastal look.
As an interior design expert, I’ve seen countless trends come and go, but some elements possess a timeless quality that transcends fads. Shiplap is undoubtedly one of them. While often associated with modern farmhouse aesthetics, its roots in traditional maritime architecture make it a natural fit for crafting a serene, coastal-inspired bathroom. It’s more than just planks on a wall; it’s about creating texture, character, and a sense of calm that transforms your daily routine.
What Exactly is Shiplap and Why It Belongs in Your Bathroom?
Before we dive into inspiration, let’s clarify what shiplap is. Traditionally, shiplap consists of wooden boards with a rabbet joint (a groove cut into the edge) that allows them to overlap and fit together snugly, creating a tight seal. This design was originally used for exterior siding on ships and barns, hence the name, providing protection against the elements. Modern shiplap often refers to panels designed to mimic this look, featuring a distinctive, small gap (often called nickel gap) between boards.
So, why bring this historic material into your most intimate space? The appeal of shiplap in bathrooms is multi-faceted:
- Instant Texture and Character: Flat, painted walls can feel sterile. Shiplap introduces subtle lines and shadows, adding depth and visual interest without overwhelming the space.
- Brightening Effect: When painted a classic white or a soft, neutral hue, shiplap bounces light around the room, making even small bathrooms feel larger and more open.
- Versatile Aesthetic: While we’re focusing on coastal, shiplap is incredibly adaptable. It can lean farmhouse, rustic, minimalist, or, crucially, distinctly coastal depending on the accompanying decor.
- Perceived Cleanliness: The crisp lines and often white finish contribute to a feeling of fresh, clean design, which is ideal for a bathroom.
Choosing the Right Shiplap Material for Your Bathroom’s Unique Needs
When considering shiplap for your bathroom, the material choice is paramount, especially given the inherent moisture in these spaces. You’ll want something that can stand up to humidity and splashes without warping or deteriorating.
Traditional Wood Shiplap
- Pine or Cedar: Real wood shiplap, often pine shiplap, offers an authentic look and feel. If you choose this, ensure it’s properly sealed on all sides (front, back, and edges) with a moisture-resistant primer and paint. Cedar has natural resistance to moisture and insects, making it a good, albeit often more expensive, option.
- Considerations: Real wood can expand and contract with humidity fluctuations, potentially leading to slight gaps or movement over time. Proper sealing is non-negotiable for longevity.
Engineered Shiplap Options
- MDF Shiplap:Medium-density fiberboard (MDF) shiplap is a popular and more budget-friendly choice. It comes pre-primed and often with the nickel gap built in, making installation easier. It’s more stable than solid wood and less prone to warping.
- Considerations: While excellent for most dry areas, MDF can swell and degrade if exposed to standing water or excessive, prolonged moisture. It’s generally suitable for bathrooms with good ventilation and away from direct splash zones (e.g., above wainscoting, on an accent wall).
The Best for High-Moisture: PVC Shiplap
- PVC Shiplap: For ultimate peace of mind in high-humidity bathrooms or areas prone to direct water contact (like around a shower or tub), PVC shiplap is your best friend. Made from polyvinyl chloride, it is completely impervious to water, mold, and mildew.
- Considerations: It can be more expensive than MDF, and some find its look slightly less “authentic” than real wood, though quality options mimic the wood grain remarkably well. It can be cut, nailed, and painted just like wood.
Always prioritize ventilation in your bathroom, regardless of the shiplap material, to ensure air circulation and prevent moisture buildup.
Designing with Shiplap: Ideas for Your Coastal Bathroom
Now for the fun part: visualizing how shiplap can transform your space. The beauty of shiplap bathroom ideas is their adaptability. You can go subtle or make a bold statement.
Classic White Shiplap: The Quintessential Coastal Look
There’s a reason why white shiplap bathroom designs are so prevalent in coastal homes. White reflects light, creating an airy and expansive feel. It evokes images of pristine beach houses and sailing ships. This classic choice provides a neutral backdrop, allowing other elements like unique fixtures, pops of color, or natural textures to shine.
Horizontal Shiplap: Expanding Your Space
The traditional orientation of shiplap is horizontal. This creates a visual effect that can make a room feel wider and longer, perfect for smaller bathrooms or powder rooms where you want to emphasize breadth. The horizontal lines draw the eye around the room, creating a sense of calm continuity.
Vertical Shiplap: Adding Height and Modernity
Don’t be afraid to flip the script! Installing vertical shiplap bathroom walls can make your ceiling feel higher, drawing the eye upward. This is an excellent trick for bathrooms with lower ceilings or for creating a more contemporary take on the coastal aesthetic. Vertical lines offer a sleek, refined look that still retains the texture and charm of shiplap.
Shiplap Accent Walls: A Focused Statement
You don’t need to cover every wall. An accent wall can be incredibly impactful. Consider adding shiplap:
- Behind the vanity and mirror to create a focal point.
- On the wall behind a freestanding tub for a luxurious, spa-like feel.
- Within a shower niche or an alcove to add a touch of unexpected texture.
Half-Wall Wainscoting Shiplap: Charm and Protection
Embrace the charm of shiplap wainscoting. Installing shiplap on the lower half of your walls, typically 36-42 inches high, offers both aesthetic appeal and practical benefits. It protects the walls from splashes and bumps, and the dividing line visually expands the room. Pair it with a contrasting paint color above for added interest.
Beyond White: Exploring Coastal Hues
While white is classic, consider soft, muted colors for a different coastal vibe:
- Light Blue or Aqua: Evokes the ocean and sky, creating a truly serene atmosphere.
- Soft Sage Green: Brings in natural elements and a calming, earthy feel.
- Pale Gray: A sophisticated neutral that can lean cool or warm depending on the undertone, perfect for a modern coastal look.
Pairing Shiplap with Essential Coastal Bathroom Elements
The beauty of shiplap lies in its ability to complement a wide range of materials and finishes. To truly achieve that fresh, coastal aesthetic, here’s how to integrate it with other design elements:
- Tiles: For floors or shower surrounds, think natural stone, classic subway tile in white or a soft color, or even a geometric hex tile for a touch of personality. Wood-look porcelain tiles can also bridge the gap beautifully.
- Fixtures and Hardware:Brushed nickel or polished chrome offer a classic, nautical feel. Brass fixtures can add warmth and a touch of vintage charm, while matte black creates a modern contrast.
- Lighting: Choose fixtures that echo a coastal theme. Think caged sconces, lantern-style pendants, or simple, clean-lined designs that allow the shiplap to be the star.
- Mirrors: A simple round mirror, a classic rectangular mirror with a natural wood frame, or even a unique porthole-style mirror can enhance the coastal vibe.
- Vanities and Storage: Opt for vanities with a light wood finish (like oak or bleached wood), crisp white paint, or even an open-shelf design to display woven baskets or folded towels.
- Natural Elements and Decor: This is where the coastal theme truly comes to life. Incorporate elements like seagrass baskets for storage, a piece of driftwood art, shell collections, or botanical prints. Fresh greenery or a small potted plant adds life.
- Textiles: Plush white towels, perhaps with a subtle stripe or texture, complement the crispness of shiplap. A natural fiber bath mat (cotton, jute) adds warmth underfoot.
Installation & Maintenance: Ensuring Your Shiplap Lasts
While installing shiplap can be a rewarding DIY project, especially with modern systems, proper execution is key for a lasting finish in a bathroom environment.
Pre-Installation Checklist
- Ventilation: Ensure your bathroom has excellent ventilation. An exhaust fan is crucial to remove humidity.
- Surface Prep: Walls should be clean, dry, and free of mildew. Repair any damage and ensure the surface is smooth.
- Acclimatization: If using real wood or MDF shiplap, allow the boards to acclimate to your bathroom’s humidity for a few days before installation to minimize movement post-installation.
- Tools: You’ll need a stud finder, a level, a measuring tape, a miter saw (or circular saw), a nail gun (or hammer), construction adhesive, and caulk.
Installation Best Practices
- Start Level: Use your level to ensure your first board is perfectly straight. This is critical as subsequent boards stack on this foundation.
- Secure Firmly: Use appropriate nails (e.g., 18-gauge brad nails for thinner shiplap, 16-gauge for thicker) into studs whenever possible. Construction adhesive can provide extra security.
- Mind the Gaps: For nickel gap shiplap, use actual nickels or spacers to ensure consistent spacing between boards.
- Seal Everything: If using wood or MDF, apply a high-quality, moisture-resistant primer to all sides and edges before painting. After installation, fill nail holes with paintable caulk and caulk along edges where the shiplap meets other surfaces (ceiling, trim).
- Paint Wisely: Use a semi-gloss or satin paint finish. These are more durable, easier to clean, and offer better moisture resistance than flat finishes. Look for paints formulated for bathrooms.
Ongoing Maintenance
Caring for your shiplap bathroom is straightforward:
- Regular Cleaning: Wipe down painted shiplap with a damp cloth and mild cleanser. Avoid abrasive cleaners that could damage the paint.
- Address Moisture: Always run your exhaust fan during and after showers. Promptly wipe up any standing water on the shiplap. Periodically check for any signs of moisture damage, peeling paint, or mildew, especially in high-splash areas.
- Re-caulk/Re-paint as Needed: Over time, caulk can degrade. Reapply as necessary. Touch up paint chips or re-paint if the finish shows significant wear.
Embrace the Coastal Calm
Incorporating shiplap into your bathroom design is an investment in creating a space that feels both welcoming and wonderfully refreshing. Whether you opt for a full wall of classic white horizontal planks, a sophisticated vertical accent, or charming wainscoting, bathroom shiplap ideas offer a transformative power that brings the soothing essence of the coast right into your home. It’s more than just a trend; it’s a design choice that speaks to timeless beauty, natural simplicity, and a fresh outlook. Go ahead, create that coastal sanctuary you’ve been dreaming of!

No Comments