
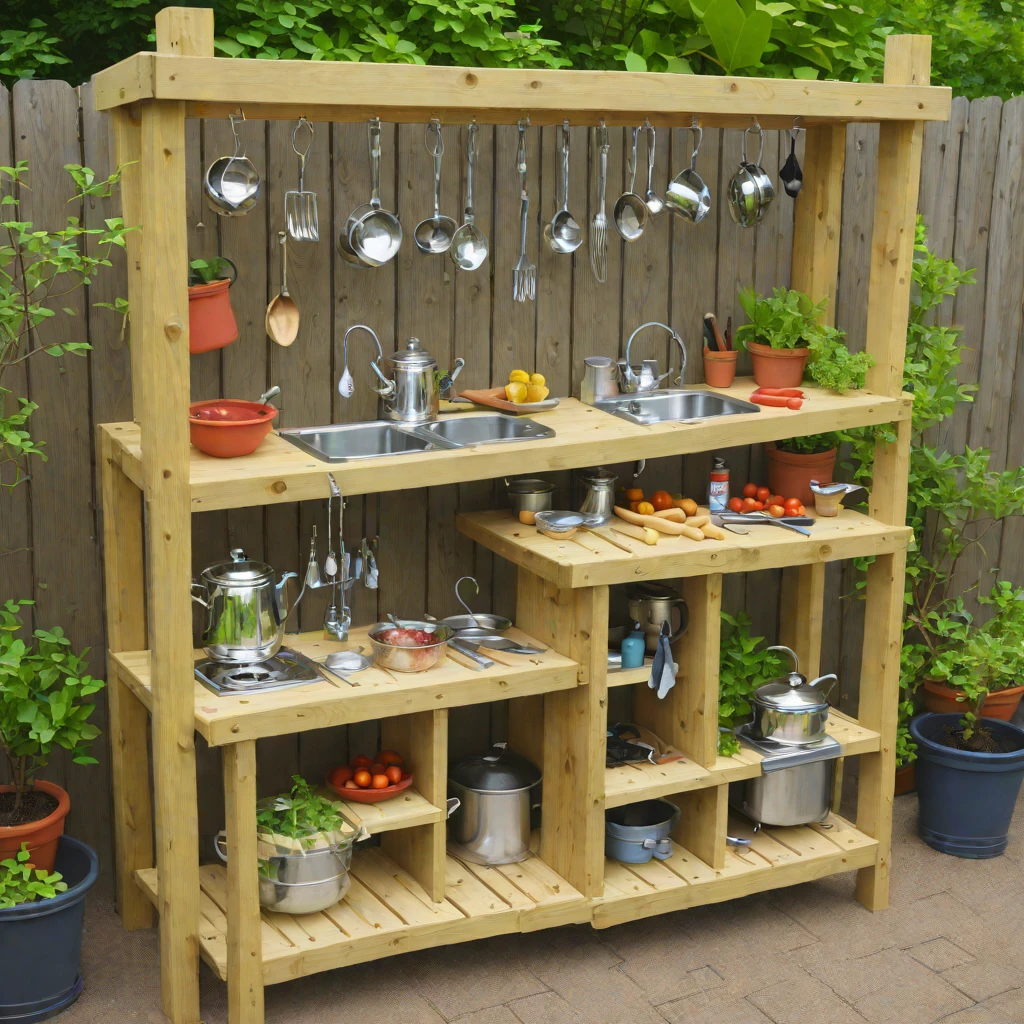
There’s a magic that happens when children connect with the outdoors, a primal joy that often involves dirt, water, and endless imagination. In this wonderful world of unstructured play, few things spark as much delight and developmental benefit as a mud kitchen. Far more than just a toy, a mud kitchen is an invitation to sensory exploration, creative problem-solving, and a deep connection with nature. As an expert in crafting engaging and enriching outdoor spaces for families, I’m thrilled to guide you through 13 inspired mud kitchen ideas that will transform your backyard into an outdoor haven for your little ones.
Why a Mud Kitchen? The Unseen Benefits of Grimy Fun
Before we dive into the creative blueprints, let’s understand why a mud kitchen is one of the most valuable additions you can make to your outdoor living space. It’s not just about keeping kids busy; it’s about fostering fundamental skills through genuine, hands-on engagement.
- Sensory Exploration: Mud kitchens engage multiple senses – the tactile feel of mud and sand, the earthy smell, the sounds of pouring water, and the visual delight of concoctions. This rich sensory input is crucial for brain development.
- Imagination & Creativity: A mud kitchen provides a blank canvas for pretend play. Children become chefs, scientists, potion masters, or gardeners, inventing narratives and expressing themselves freely.
- Fine Motor Skills & Problem Solving: Scooping, pouring, mixing, stirring, and arranging all hone fine motor skills and hand-eye coordination. Faced with “recipes” or “experiments,” kids learn to problem-solve, experiment with textures, and understand cause and effect.
- Connection to Nature: In an increasingly digital world, a mud kitchen encourages children to engage directly with natural elements like soil, water, leaves, pebbles, and twigs, fostering a lifelong appreciation for the environment.
- Social-Emotional Development: When playing with others, children learn cooperation, negotiation, sharing, and communication as they collaborate on their muddy creations.
Key Considerations Before You Build or Buy Your Mud Kitchen
Whether you’re planning a DIY project or investing in a ready-made option, a little forethought goes a long way. Consider these elements to ensure your mud kitchen is both fun and functional for years to come.
- Location & Drainage: Choose a spot that’s easily accessible but also where mess is welcome. Proximity to a water source is a huge plus. Ensure good drainage to prevent standing puddles and excessive slipperiness.
- Materials & Durability: Mud kitchens live outdoors, so opt for materials that can withstand the elements. Treated wood, exterior-grade plywood, salvaged materials, or even plastic components work well. Focus on sturdy construction that can handle enthusiastic play.
- Size & Scale: Think about the age of your children and the available space. A toddler might need a lower countertop, while older children could benefit from multiple work surfaces. A compact unit works for small yards; a larger setup might be better for multiple children.
- Safety First: Ensure all materials are non-toxic and free of splinters, sharp edges, or pinch points. Securely attach any components. Supervise young children, especially around water.
- Accessories & Loose Parts: While the kitchen itself is key, the loose parts are what bring it to life. Think old pots, pans, spoons, measuring cups, and natural elements like pinecones, shells, and flower petals.
13 Mud Kitchen Ideas for Every Backyard & Budget
Now, let’s explore some fantastic mud kitchen ideas, ranging from simple upcycles to more elaborate custom builds. Each offers a unique flavor of outdoor play.
1. The Upcycled Pallet Wonder
This is a classic for a reason: economical, sturdy, and full of rustic charm. You can often find free or low-cost wooden pallets from local businesses. Disassemble them carefully, sand down any rough spots, and reassemble them into a basic frame. Add a countertop made from another pallet plank or a piece of exterior-grade plywood. Screw on some hooks for utensils and consider a small shelf underneath. Finish with a coat of outdoor sealant or paint for durability.
2. The Sturdy Log & Stump Setup
Embrace nature’s raw beauty with a mud kitchen built from tree logs and stumps. Use larger stumps as base cabinets or seats, and smaller logs or a reclaimed wooden board for a countertop. You can even hollow out smaller log sections to create integrated bowls or basins. This design blends seamlessly into a natural garden setting and promotes a deeper connection with the environment. Ensure all wood is stable and free of rot or pests.
3. The Compact Container Creation
Perfect for smaller patios, balconies, or rented spaces, this idea uses readily available containers. Think sturdy plastic storage bins, large planters, or even an old galvanized tub. Arrange them on a low table or directly on the ground. One container can be for mud, another for water, and a third for “ingredients.” Add a small cutting board on top of one bin to create a workspace. This is incredibly flexible and easy to store away.
4. The Vintage Dresser Reimagined
Give an old dresser a new lease on life as a charming mud kitchen. Remove the drawers (or use some for storage), sand and paint it with weather-resistant outdoor paint, and seal it thoroughly. Cut holes into the top surface to drop in stainless steel mixing bowls or a small sink basin. The existing structure provides instant shelves and cubbies for pots and pans. Look for dressers made of solid wood for better longevity.
5. The Functional PVC Pipe Plumber
For the child who loves water play, integrate a simple water delivery system using PVC pipes. Create a basic frame for your mud kitchen, then add a small hand pump or a gravity-fed water tank (like a rainwater barrel) connected to PVC pipes that flow to a “sink” area. This teaches children about plumbing basics and adds an exciting, interactive element to their play. Ensure all connections are secure and leak-free.
6. The Integrated Garden Bed Kitchen
Blend your mud kitchen seamlessly into your existing garden. Design a raised garden bed with a section dedicated to a mud kitchen. One end of the bed can be soil for planting, while the other features a work surface and designated “mud zone.” This encourages gardening alongside cooking, allowing kids to harvest real herbs or flowers for their mud pies. Use cedar or Douglas fir for the raised bed for natural rot resistance.
7. The Portable & Packable Mud Station
If space is a premium or you want the flexibility to move your play, consider a portable design. This could be a lightweight folding table with a few designated bins for mud and water, or a small trolley cart with shelves. The key is ease of setup and breakdown. Look for materials like aluminum or heavy-duty plastic for lightweight durability. This is also great for taking to different spots in the yard or even camping.
8. The Dual-Level Chef’s Delight
Perfect for siblings of different ages or multiple children, this design features countertops at two different heights. The lower level can be for toddlers, while the higher one suits older preschoolers or elementary children. This allows for collaborative play without constant jostling. You might also include a small “oven” space or multiple “burner” areas to accommodate several chefs at once. Use sturdy pressure-treated lumber for the frame.
9. The Enchanted Forest Nook
Create a truly magical experience by building your mud kitchen into a natural setting. Use branches, fallen logs, and moss-covered stones to define the space. A canopy of leaves or a simple tarp provides shade. Incorporate elements like a “stove” made from stones, a “sink” from a hollowed-out log, and natural shelving. This encourages imaginative, story-based play within an immersive environment. Focus on locally sourced, sustainable materials.
10. The Modern Minimalist Mud Hub
For those who prefer a clean, contemporary aesthetic, a minimalist mud kitchen can be stunning. Think simple, clean lines, perhaps a single large workbench made from smooth, untreated wood or even a concrete slab. Use stainless steel bowls and basic, robust utensils. The focus is on functionality and natural materials, allowing the mud and natural elements to be the stars. Consider a sleek white or natural wood finish.
11. The Builder’s Workbench Inspiration
Mimic a traditional workbench with a sturdy, flat surface, perhaps a pegboard backsplash for hanging tools, and open shelving underneath. This design emphasizes practicality and organization. It’s great for children who enjoy construction and tinkering. Use robust materials like thick plywood or solid timber for the workbench top. Incorporate small vices or clamps for added realism and fine motor challenges.
12. The Water Wall & Mud Mix Station
Elevate water play with a dedicated water wall. Attach various tubes, funnels, and containers to a vertical surface (like a fence or a sturdy board) allowing water to flow down in different paths. Integrate this with a mud mixing station below. Children can experiment with gravity, flow, and texture, creating magnificent muddy concoctions. Ensure the water wall components are securely attached and made from safe, durable materials like recycled plastic bottles or PVC piping.
13. The Community Collaborator Mud Pit
If you have a large backyard or are setting up for a school or community garden, consider a large, open mud pit area designed for multiple children. Surround it with various work surfaces – stumps, low tables, or even just large, flat stones. This design emphasizes collaborative play, allowing many children to engage simultaneously. Ensure easy access to water, plenty of space, and a variety of loose parts to encourage diverse activities.
Stocking Your Mud Kitchen: Essential “Ingredients” & Tools
Once your mud kitchen is built, the real fun begins with equipping it. Think of it as preparing a gourmet outdoor pantry:
- Cooking Utensils: Old pots, pans, muffin tins, baking trays, spatulas, whisks, ladles, colanders, measuring cups, and spoons.
- Mixing & Serving Ware: Various sized bowls (plastic or stainless steel), plates, small cups.
- Natural Elements: Pinecones, acorns, leaves, twigs, small stones, sand, flowers, herbs (check for non-toxic varieties).
- Water Source: A bucket, watering can, small pump, or a direct hose connection.
- Durable Scoops & Diggers: Small shovels, trowels, buckets for transporting mud.
- Sensory Add-ins: Seashells, small plastic animals, pebbles, bottle caps, fabric scraps for decoration.
Maintenance & Longevity Tips
To keep your mud kitchen a beloved fixture for years, a little care goes a long way.
- Regular Cleaning: Periodically spray down the surfaces with a hose to remove excess mud. Clean any bowls or utensils.
- Weatherproofing: If your mud kitchen is made of wood, reapply a suitable outdoor sealant or paint every year or two to protect against rot and weather damage.
- Drainage Check: Ensure your mud kitchen area continues to drain well. You might need to add more gravel or adjust the ground level over time.
- Winter Storage: If you live in a harsh climate, consider covering smaller mud kitchens or bringing delicate accessories indoors for the winter.
- Inspect for Safety: Regularly check for loose screws, splinters, or general wear and tear that could pose a safety hazard.
A mud kitchen is truly an investment in your child’s development and well-being. It’s a space where imaginations flourish, skills are honed, and unforgettable memories are made. By choosing one of these 13 mud kitchen ideas, you’re not just creating a play area; you’re cultivating a vibrant, enriching outdoor environment where your children can explore, discover, and simply be kids. So, gather your materials, roll up your sleeves, and prepare for a world of muddy magic!


No Comments