
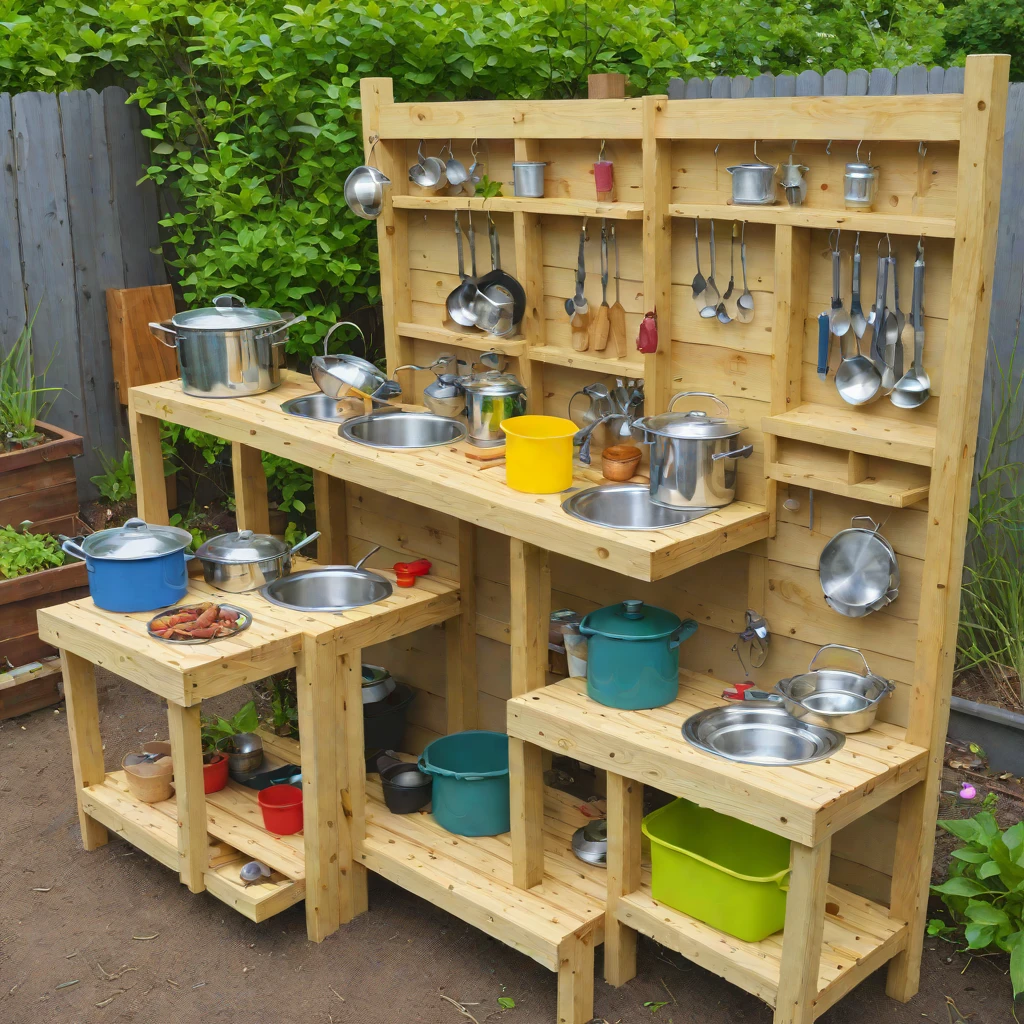
There’s a special magic that happens when children connect with nature, and few things spark imaginative play quite like a mud kitchen. Far more than just a plaything, a DIY mud kitchen is a gateway to sensory exploration, creative problem-solving, and hours of outdoor fun. As an expert in home improvement and lifestyle design, I’ve seen firsthand the joy and developmental benefits these simple structures bring. Building your own isn’t just a rewarding project for you; it’s an investment in your child’s natural curiosity and a charming addition to your outdoor space.
If you’re looking for a project that’s both meaningful and manageable, you’ve come to the right place. This comprehensive guide will walk you through everything you need to know to build a mud kitchen that’s durable, engaging, and perfectly suited for your little chefs. Forget flimsy plastic sets; we’re talking about a real, tactile experience that will stand up to endless “mud pies” and “leaf soups.” Let’s get digging!
Why Build a Mud Kitchen? Unearthing the Benefits
Before we dive into the sawdust and screws, let’s explore why a mud kitchen is such a brilliant idea for your backyard. It’s more than just a toy; it’s an environment for growth.
- Fosters Sensory Exploration: Children engage with different textures, temperatures, and smells – mud, water, sand, leaves, flowers. This rich sensory input is crucial for brain development.
- Encourages Imaginative Play: With open-ended materials, children are free to be chefs, scientists, gardeners, or potion makers. There are no rules, just endless possibilities for storytelling and role-playing.
- Develops Fine and Gross Motor Skills: Scooping, pouring, stirring, mashing, and transporting materials all contribute to strengthening muscles and improving coordination.
- Boosts Problem-Solving and Critical Thinking: How do you make the mud just the right consistency? How do you get water from one bowl to another? Children naturally experiment and learn cause and effect.
- Supports Language and Social Skills: When playing with siblings or friends, children negotiate, share, communicate ideas, and create narratives together.
- Connects Kids with Nature: It encourages appreciation for the natural world, allowing them to explore elements like dirt, water, and plant life in a hands-on way.
- Provides Calming and Regulating Experiences: The tactile nature of mud and water play can be incredibly soothing and help children process emotions and de-stress.
Planning Your Mud Kitchen: The First Scoop
A successful DIY mud kitchen project begins with thoughtful planning. Consider these factors before you start gathering materials.
Location, Location, Location
Where will your mud kitchen live? Choose a spot that offers:
- Easy Access to Water: Near a hose spigot or a rain barrel makes life much easier.
- Proximity to Nature: Under a tree, near a garden bed, or on a patch of grass provides natural ingredients like leaves, twigs, and pebbles.
- Drainage: Mud kitchens can get messy! Ensure the area drains well to prevent standing water and muddy puddles around the structure itself.
- Shade: Partial shade is ideal for comfort during sunny play sessions.
- Visibility: If you have younger children, ensure the mud kitchen is visible from a common adult supervision area.
Size and Scale
Think about the age and number of children who will be using it. A younger child might benefit from a lower countertop, while older kids might appreciate more surface area and shelving. You can always start small and expand later.
Design Inspiration: Simple or Elaborate?
A mud kitchen can be as simple as a few planks of wood and an old sink, or as elaborate as a fully outfitted outdoor play station. Decide on your vision and skill level:
- Basic: A countertop, a basin for a sink, and perhaps a lower shelf.
- Intermediate: Adds more shelving, hooks, and perhaps a “hob” area.
- Advanced: Incorporates a working tap, a chalk board, an oven compartment, or multiple play zones.
Materials & Tools Checklist: Gearing Up for the Build
One of the beauties of a mud kitchen is its adaptability. You can use reclaimed materials, new lumber, or a combination. Here’s a comprehensive list to get you started on your homemade mud kitchen.
Essential Materials:
- Wood:
- Pressure-treated lumber: For the main frame and legs, as it resists rot and insects. Look for 2x4s or 4x4s.
- Exterior grade plywood or decking boards: For countertops and shelves. Consider cedar or redwood for natural resistance, or treated pine.
- Reclaimed wood: Pallets (ensure they are heat-treated, marked HT, not chemically treated), old fence panels, or salvaged planks are excellent for an eco-friendly approach.
- Sink Basin: An old metal or plastic sink, large mixing bowl, or even a sturdy washing-up tub.
- Screws/Fasteners:Exterior-grade wood screws (e.g., galvanized or stainless steel) that won’t rust.
- Wood Glue: For extra stability, especially for joints. Ensure it’s waterproof.
- Outdoor Paint or Sealant (Optional but Recommended): A non-toxic, weather-resistant paint or clear sealer will prolong the life of your mud kitchen.
- Accessories (for play): Old pots, pans, mixing bowls, spoons, ladles, small buckets, plastic containers, silicone molds, natural elements (pinecones, pebbles, shells).
Essential Tools:
- Measuring Tape: For accurate dimensions.
- Pencil: For marking cuts.
- Saw: A circular saw, jigsaw, or hand saw for cutting wood.
- Drill/Driver: For drilling pilot holes and driving screws.
- Drill Bits: Various sizes, including a spade bit or hole saw if you’re cutting a circular sink opening.
- Sander or Sandpaper: To smooth rough edges and prevent splinters.
- Safety Glasses: Always protect your eyes!
- Work Gloves: To protect your hands.
- Clamps: Helpful for holding pieces in place while assembling.
- Square: To ensure cuts and joints are at right angles.
How to Build a Mud Kitchen: A Step-by-Step Guide
This guide outlines a relatively simple, sturdy design that can be easily customized. Remember, precision is good, but don’t let perfection be the enemy of fun! A slightly rustic look is part of the charm of a DIY outdoor play kitchen.
Step 1: Plan Your Layout and Cut Your Wood
Based on your chosen size and design, draw a simple sketch and list your cuts. For a basic mud kitchen, you’ll need:
- Legs: 4 pieces (e.g., 2x4s or 4x4s), cut to your desired countertop height. Add an extra 6-12 inches if you plan to sink them into the ground for stability.
- Frame for Countertop: 4 pieces (e.g., 2x4s), two longer for front/back, two shorter for sides, to form a rectangle.
- Countertop Surface: 1 large piece of plywood or several decking boards, sized to fit the frame.
- Lower Shelf Frame (Optional): 4 pieces similar to the countertop frame, positioned lower down.
- Lower Shelf Surface (Optional): Plywood or decking boards to fit this frame.
- Backing (Optional): A piece of plywood or a few vertical planks for a backsplash or a surface to attach hooks.
Pro Tip: When cutting, always measure twice and cut once. Label your pieces as you cut them to avoid confusion during assembly.
Step 2: Assemble the Frame and Legs
- Create the Countertop Frame: Lay out your four countertop frame pieces into a rectangle. Use a square to ensure all corners are 90 degrees. Predrill pilot holes and then secure the corners with exterior wood screws. Use wood glue for added strength.
- Attach the Legs: Stand your frame upright. Position each leg at a corner, flush with the top edge of the frame. Ensure the legs are square to the frame. Secure each leg to the frame with two or three screws per side, predrilling to prevent splitting.
- Add the Lower Shelf Frame (if desired): Measure your desired height for the lower shelf. Attach the lower shelf frame to the legs in the same way you attached the countertop frame. This creates a sturdy base and storage space.
- Ensure Stability: Give the frame a gentle wobble. If it feels unstable, add diagonal braces (small pieces of wood screwed diagonally across corners) for extra rigidity.
Step 3: Install the Countertop
- Position the Countertop Surface: Lay your chosen countertop material (plywood or decking boards) onto the assembled frame. Ensure it’s flush with the edges or overhangs slightly, depending on your design preference.
- Mark the Sink Opening: Place your chosen sink basin upside down on the countertop where you want it. Trace around the rim. Draw a second line inside this tracing, about 0.5 to 1 inch smaller, to create a lip for the sink to rest on.
- Cut the Sink Opening: Drill a pilot hole inside your smaller traced line. Use a jigsaw to carefully cut along this inner line. If using a round basin, a hole saw can make a cleaner cut.
- Secure the Countertop: Once the sink hole is cut and checked for fit, secure the countertop to the frame using screws, spacing them evenly.
- Insert the Sink: Drop your basin into the opening. It should sit securely on the lip you created. You can use a bead of exterior-grade sealant around the rim for a tighter fit, though it’s not strictly necessary for a mud kitchen.
Step 4: Add Shelving and Backing
- Install the Lower Shelf (if desired): Place your lower shelf material onto the lower frame. Secure it with screws.
- Attach the Backing (if desired): If you want a backsplash or a surface for hooks, attach a piece of plywood or vertical planks to the back legs and countertop frame. Use screws.
Step 5: Sand and Finish
- Sand All Surfaces: Use a sander or sandpaper to smooth all rough edges, corners, and surfaces. This is critical for preventing splinters and ensuring safe play.
- Apply Finish (Optional): If you’ve used untreated wood, applying a non-toxic, outdoor-grade sealant or paint will protect it from the elements and extend its life. Choose finishes that are safe for children’s toys. Allow it to cure fully before play.
Mud Kitchen Ideas and Enhancements: Level Up Your Play Space
Now that you have the basic structure, let your creativity flow! Here are some popular enhancements to make your kids mud kitchen truly special.
- Water Source:
- Manual Pump: A small hand pump attached to a bucket of water can provide a fun, interactive water source.
- Simple Tap: Attach a simple garden tap to a small water barrel or a hose connection (ensure it’s easy for little hands to operate).
- Bucket and Ladle: The simplest option – a bucket of water nearby with a ladle for pouring.
- Chalkboard Backsplash: Paint a section of the backing with chalkboard paint. This allows kids to write menus, draw recipes, or tally their creations.
- Utensil Hooks: Screw in some small hooks for hanging old pots, pans, sieves, and kitchen tools.
- Oven or Stove Top:
- Stove Top: Attach a piece of plywood with painted “burners” or use old CDs for a realistic look.
- Oven: Create a small cabinet with a hinged door below the countertop for an “oven.”
- Shelving for Ingredients: Add small shelves or cubbies for storing natural “ingredients” like pinecones, stones, or leaves.
- Nature Discovery Station: Incorporate magnifying glasses, small bug-viewing containers, or a section for planting seeds.
- Seating: A small stool or log can provide a comfortable spot for extended play.
- Herb Garden: Plant some child-safe herbs (like mint or thyme) nearby that can be used as “ingredients.”
Safety Considerations for Your Mud Kitchen
As with any child-focused project, safety is paramount. Keep these points in mind:
- Splinter-Free Surfaces: Sand all wood thoroughly, especially edges and areas children will touch frequently.
- Secure Construction: Ensure all joints are tight and screws are fully driven. Check for wobbles and reinforce as needed.
- Non-Toxic Materials: If painting or sealing, use products that are certified non-toxic and safe for children’s toys and outdoor use.
- No Pinch Points: If adding doors or hinges, ensure they won’t pinch small fingers.
- Supervision: While mud kitchens encourage independent play, always provide appropriate supervision, especially for younger children.
- Cleanliness: Remind children not to eat mud or natural elements. Have a designated hand-washing station nearby.
Maintenance and Care: Keeping the Fun Flowing
To ensure your mud kitchen provides years of joyful play, a little maintenance goes a long way:
- Regular Cleaning: Hose down the mud kitchen periodically to remove built-up mud and grime.
- Inspect for Wear: Annually check for loose screws, splinters, or signs of rot. Address these promptly.
- Re-seal (if applicable): If you’ve sealed the wood, reapply a protective coat every few years, or as needed, based on weather exposure.
- Store Accessories: Bring in metal pots and pans during harsh weather to prevent rust and prolong their life.
Conclusion: The Heart of Your Backyard
Building a mud kitchen is more than a simple DIY project; it’s about creating a space where imagination can flourish, where little hands can get wonderfully messy, and where learning happens through the most joyful, natural means. You don’t need to be a master carpenter to create a robust and beautiful outdoor play kitchen. With a bit of planning, some basic tools, and a willingness to embrace the rustic charm of repurposed materials, you can craft a treasured spot that your children will adore for years to come.
So, gather your supplies, put on your work gloves, and get ready to build not just a mud kitchen, but a hub of creativity and connection with nature in your very own backyard. Happy building, and happy playing!



No Comments